Monday, April 29, 2019

monday moment: sneaky


Major thinks he is being so sneaky as he darts past me in the "forest" in the upper pasture. He only gets to play in there when I come back from a ride and the other horses are put away for dinner. He bucked and farted his way…to his own gate, to be let in for dinner. A true wild spirit…

Thursday, April 25, 2019

d.i.y.: feed sack grooming tote cover

Guilty admission: I have a messy grooming tote. I do not wash my brushes very frequently. Crumbs, mud, pieces of dead carrot and dirty hoof picks abound. Purple-stained leather gloves, bottles of stuff and spray and random tools get unceremoniously shoved in. Every few months it gets overwhelming, and I toss a few things back into the storage box, and hose the tote out. That is pretty much all the cleaning it has gotten for 15 years.

and this is cleaned out…

But I like THIS tote. My friend C got it for me as a gift when I got my first horse. It is not orange, but it is useful and does not need to be replaced. But if I could cover the mess…

I saw some covers you could buy and others you can sew (totally not going to happen), so I made one up (I'm sure I'm not original) and here is a basic guide.

tools needed, just add tote!

Materials needed:
Feed sack (the plastic-coated kind, not paper)
sturdy tape (like duct tape, colors help!)
ruler
pen
scissors
not necessary but could be helpful: utility/hobby knife and glue

The trickiest part of this is the measuring and figuring. My feed sack (Major only eats one thing that comes in a bag), when opened and torn parts trimmed, measured 25x30. My tote, across the top area, is 13.5x17.5 and the handle is 9x2. You need to figure in the "drop" down the sides, and mine came out at 5.5 each side, (because that would fit on the sack!) (Larger sack would mean you could make the drop larger, but honestly, this has been working fine.). The second tote I made I got smarter: I made a basic template and traced it. Do what works for you.


measure and draw lines
or use this basic template (if you have the same tote)
and trace into position on bag (I wanted the horse on the bag to be in a certain position on this one)


Draw all the lines needed on the back side of your sack. Measure twice (or three times!) then you can cut. Do the handle first: cut a double Y cut, crease and fold back, and tape the edges.

how to make the handle cut

clear duct tape is otherwise useless, good for this project though!

Now the sides. Crease the lines really well, back and forth until the fold holds (an old credit card works well for this). Now here it would help to have a helper, (and that is why there are no photos) but fold one edge in and the other up to create the corner. Tape on the inside (so if it is ugly it doesn't matter!). I also tried glue, but it didn't really work and don't recommend.

inside after rough taping

Then you can clean it up a little. Put the tape nicely along the inside corners, along the bottom edge, handle edge, etc. I got "fancy" and did that part with my colored duct tape!

completed tote cover!

Cover created! It took about an hour, but half of that was measuring and trying to take photos in my dark living room (sorry!). It might not be the prettiest, but it works!

Where are my treats? Can I lift this off?

I could see at certain busier barns this might help with "borrowing" of stuff, as an added deterrent. Major gave it a thorough inspection and as long as treats can still be provided, gave it his approval. I know all of you have sparkling clean grooming totes with perfect brushes, but if you still want to make one, have fun!

This is the second one I made, because I am vain and liked the design better of a bag I found in the trash

Thursday, April 18, 2019

not pictured


the "cow pasture" view
Some rides get lots of pictures, some get almost none. Most are pretty similar: pretty scenery, Major's ears and/or face…yeah, that's about it!

entwined oaks
new trail improvements, now needed in about 400 other places!

Last ride, while admiring the view (again) but not stopping much, I thought about all the things I saw that day that were not pictured:

Pink redbud blooms covering the trail
Cooper's hawk flying on the path ahead of us
Major blowing bubbles in the water trough
Glancing down the dropoff to see a tiny hummingbird perched on a branch
Swooping sideways, a red-shouldered hawk catching a gust
Turkey footprints in the mud puddle
Blooming lupine under the water as the lake rises

watching people down at the lake

Those are what I remember after a ride, the basic view picture just reminds me of all those things.


From the sublime to the stupid: then I laughed and reminded myself of "not pictured" in the school yearbook. There are so many things Major could be: most likely to barge into the unknown, class clown, best piggy impersonation…does your horse have a class title?


Sunday, April 14, 2019

detour: headlands

My preferred detour: the ocean. Spending the weekend with ocean smells and views, cold wind and warm sand is good for my spirit. The first stop was in Bodega Bay, out on the spit of land simply called the Head.
Bodega Bay turning into mud flats as the tide goes out

The trails on the Head can be cold and wintery, all year round, but were pretty perfect the day we were there. And just easy, rolling trails with blue sky, gray sea and green grass views. The Bodega Marine Laboratory is on government land out there, not open to the public, except special days. I spent a few weeks there one summer as a teen, and learned I did NOT want to be a marine biologist (but it was fun anyway)! I'll re-visit another time. They do have a webcam in the cove that is fun to check out!

the laboratory below on horseshoe cove
For as vast as the northern California coast is, these parts are very lacking in trails. Sometimes it is because it in inaccessible, or they ran Highway 1 right on the cliff, or it is private land. But sometimes it all comes together, and I was happy to explore the new Jenner Headlands Preserve, recently opened by the Wildlands Conservancy.

car looks tiny, Russian river, Goat Rock views
This area is north of Bodega Bay, in Sonoma County. They have a nice, small parking lot, informational panel, and even a map! The trails that were open started off pretty steep! I'm not sure if they did more than drive a tractor over them and call it a trail (I'm sure they did, but they're a bit rough, and sometimes hard to find!) but the views were worth it.


this is just to the first overlook, complete with telescope
one of these things is not like the others! top row: tufted poppy, bowl tube iris, golden eggs suncup. bottom row: rosy sand crocus, baby blue eyes and a native succulent (my best guess at identifications)
keep going…

There were wildflowers, and we even found a deer antler! In all my miles of hiding and riding I've never found one, assuming they are usually gobbled up by critters or hidden in shrubbery. I'll be back to explore more of the trails (a few were closed for treacherous conditions), because we didn't get even close to the highest point!


The fog was creeping in, and the hiking day was done. The sunset decided to put on a great show over Bodega Head.

the fog comes on little cat feet…

crazy cloud sunset

The next day, hiking along morning sand, it was almost time to go home. Almost too cold for bare feet, but here was a sand dollar, and let's just take a few moments more…

non-native Pride of Madeira is still an awesome plant

left behind

simple ways to remember

Wednesday, April 10, 2019

d.i.y.: grooming tool


so satisfying
Winter fur be gone! Now this is not an original idea. Lots of people have made these, but this tool is awesome and everyone should have one! I figured one more basic tutorial wouldn't hurt, plus a giveaway!

this is my bad/crabby side: not amused at taking ugly photos of me
This tool is a basic hacksaw blade with a wood handle. Before I used it I was concerned about the teeth being too sharp, Major not liking it, etc. But no worries, unless you literally try to saw on your horse (not advised!) this won't do any damage. Major is too sensitive to use the standard metal curry, but he loves this tool.

needed tools

Basic tools needed are:
hacksaw blade (I bought 18 TPI (teeth per inch) 10 inch blades, about $3)
wooden pieces (I used a stir stick from the paint department!)
glue (E6000 is the best)
duct/sturdy tape
hacksaw or something to cut the wood (utility knife will work too)
not pictured: pliers

First thing is to figure out the length you want. My blades were 10 inches (what they had in stock). I felt that 10 inches is too long for the tool, 8 inches seems about right (if you bought a 12 inch blade you could make two six inch ones!). To shorten the blade grab either side with a plier and just bend it back and forth a couple times, the blade will snap nicely!

use pliers to bend/break the hacksaw blade

Now one end is smooth and the other jagged. I bent off the rough corner, then did a fancy sanding job…using the concrete. It works great!

"sand" the rough corner/edge off on the concrete
Now trim your boards a little longer than the blade. I used a hacksaw and miter box, but honestly, this isn't precision work at this point, and scoring/cutting with a utility knife would work too. I did a rough sand of the corners and edges of the boards.

trim the boards to size (8 inches each in my case)
do a rough sanding of the wood

Test your blade sandwich. You want it to stick out about 1/8 inch. Now for the glue: run a bead of glue along the board, one for the blade and the other higher up. Place the blade with the correct amount sticking out, run a bit more glue on it, then sandwich the whole thing. Use the fancy clamps (binder clips) to hold it together. Smashing it under a brick would work too.

how far the blade should stick out

glue on the first board

glue on placed blade

fancy clamps to hold it all together
Now wait for it to dry. Go eat some dinner or something (full disclosure, I had cereal for dinner!). After the glue is dry you can clean it up a bit if some oozed out, but I didn't find I needed to. Now your tool is technically complete, but I didn't like the feel of the wood handle, and wanted to make it a little sturdier.

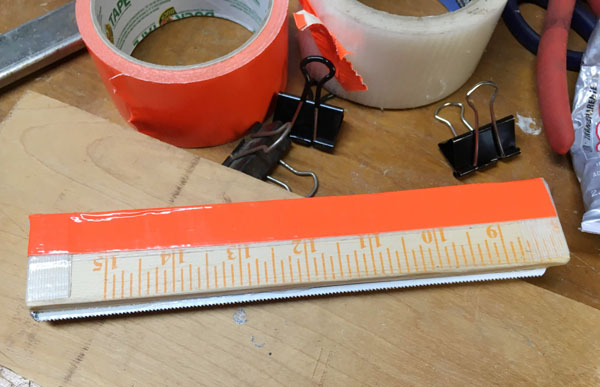
done, but tape does help the handle

Use some duct tape (of whatever variety you have laying around) to wrap the handle a couple times till smooth. Then you can accessorize with color if you want (orange of course!). DONE.

add tape to top and edges

final accessory tape not needed but AAO (always add orange)

Very satisfying, simple project. Even more satisfying is grooming off all the dirty winter hair to reveal shiny spring fur!

getting shiny!
love the texture and color

This is not an artisan tool, but mine has worked for me for two seasons. Now, since I already have one of these, and don't need two, who wants this one? Giveaway time: Comment below and I'll pick one random name and send you the tool I just made (sorry about the orange!). Just let me know if it works for your horse!

Monday, April 8, 2019

monday moment: carrot table


All those carrots, for me?
No Major, you can have two.


Look, I get all these carrots!
You can have two Major.


This is the best day ever, I got all the carrots!
You had two Major, but sure, you had ALL the carrots.
Awesome.

Saturday, April 6, 2019

two feet

I do like hiking and all that I can see and explore on my own. With Major semi-broken I still need to get out, so I've been exploring.

Some of the usual places, like the Auburn confluence, but from a different perspective. On this cloudy afternoon there were very few people, and no one down on the lower beach area (stay away from the water though!). Added bonus: from down here I can't see the ugly chain-link fence they added to the railings!

a different perspective

below No Hands bridge

downriver view
Then a place I'd only been a couple time, Sacramento Bar. It is lower down the American river (in Sacramento, duh!) and the last of the gold dredging areas (into the 1960s), so some of the walking is over giant piles of river rocks. Not the easiest on your feet! But the flowers were lovely. And FYI: do not feed a goose one of your Doritos (nacho flavor). They will not leave you alone. (yes, I know better, but damn, they're cute!)

poppies among rocks

just one more please?

cool spiky scary weed

But two feet is not always easier than four, especially when climbing big hills. A long time ago I took Major up Cardiac hill, but it is so eroded now, down to slick rock, I don't think I'd do that again. I'll keep doing it myself, and hopefully improve on my laughable pace up the hill. It only took 20 minutes, but the longest 20 minutes ever. Yeah, I'm stopping to take a picture of this lovely flower, not just trying to catch my breath!

first vetch flowers

alien-head rock is watching

a moment of zen before starting up the hill

laughable pace chart!

lovely wild iris
Major is on the mend, and we'll be using his four feet as transport soon, but I admit that literally stopping to smell the flowers is pretty nice too.

Major the street walker


busy bee on weeping cherry tree